Thursday, 2 February 2012

Speed up your pendrives file copying speed in Windows

You might have noticed slow copy speeds with some pen drives. Here is a tweak which help in increasing the speed or giving a speed boost to your pendrive.
By enabling this tweak, the write caching option in windows will be enabled.
  • Plug in your USB Drive.
  • Then Open My Computer> right-click on your USB Drive >click Properties.
  • Select your USB drive Under Hardwares and choose Properties.
  • You will see a dialog box saying ” Optimize for quick removal”.This option is selected by default.
  • Select “Optimize for Performance”option.
  • Now, remove USB drive and plug it again.
  • Copy some files from the drive to your system or vice-versa. You can notice the speed increase.
After enabling this option in windows, make sure you use the Safely remove hardware option in windows each time you remove the removable drive from windows otherwise you might encounter errors with the pendrive. Though the tweak might not give exceptional speed boost to your usb drive but it will come in handy while copying large files.

Get/Add the RUN command in Windows Vista/7 Start Menu

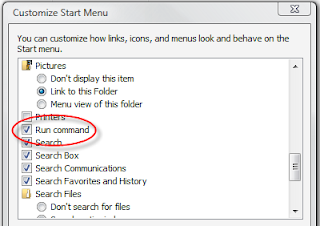
Don’t see the run command in Vista’s/7 start menu like in Xp? Don’t worry.You can add the run command to vista’s start menu very easily.Here is what you have to do.
  1. Choose properties by right clicking on the start menu.
  2. Select the customize button under start tab.
  3. Scroll down and tick the run command option.
  4. Select apply and then press OK.
  5. If you have any doubt check the screen shot below.
start menu Get/Add the RUN command in Windows Vista Start Menu
Select the start button now and you will see the run command.

Super Fast Shut down in windows under 2 seconds!!

Here is trick to shutdown windows like never you have done before.This trick can be used to do an emergency shut down.You will be surprised to see windows getting shut down under 2 seconds!!!. At first make sure that you don’t have any unsaved works. So here is how you do it.
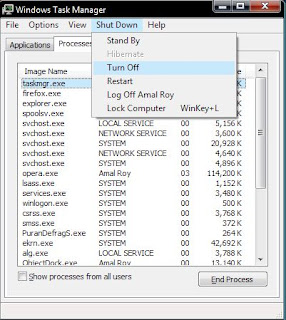
  1. Call up the task manager by pressing Ctrl + Alt + Delete or by pressing Ctrl + Shift + Esc(for vista users.Xp users too can do this.)
  2. Pressing Ctrl + Shift + Esc will directly call the task manager in vista.
  3. Now from the menu bar select the shutdown option.
  4. Hold Ctrl and press Turn off.
taskkkkkkk Super Fast Shut down in windows under 2 seconds!!
You will see windows shutting down under the blink of an eye.

We don’t recommend shutting down windows this way. Use it only in case of an emergency.

20 Keyboard Shortcuts to Enhance Your Web Browsing Speed

Shortcuts are one of the key ways to go if you are thinking of how can i work more faster with my web browser? No matter what all tweaks you apply to speed up your browsers still you will find some thing missing. Yes! they are Keyboard Shortcuts. Using Keyboard Shortcuts will greatly help you to work faster with your browser. A lot of your time and energy can be saved by using simple Keyboard Shortcuts?keyboard shortcuts 20 Keyboard Shortcuts to Enhance Your Web Browsing Speed So, it is essential to know some basic Keyboard Shortcuts that will help you to work faster with your Web Browser and saves you a lot of time. Here are some of them.

Keyboard Shortcuts for Internet Explorer, Firefox, Google Chrome, Opera and Safari

Ctrl + T (Open A New Tab) – Instead of right clicking and selecting or clicking the New Tab option, using the Ctrl + T keyboard shortcut will help you open a new tab in the current window.
Ctrl + W (Close the Current Tab) – Like Opening a New Tab in your browser, this will help you to Close the Current Tab you are working with.
Ctrl + N (Open A New Window) – This will help you to open up a new window in your browser.
Ctrl + D (Bookmark Current Website) – Bookmark your useful websites using this easy shortcut.
F5 ((Refresh)) – Refresh the Current Open Tab.
Ctrl + F5 (Hard Refresh) – Clear the cache of the current stored webpage and stores a fresh new copy. Thats what a Hard Refresh is for. Helpful when just posted comments don’t appear etc.
Ctrl + H (Show History) – You know it! Show the history of previously visited webpages.
Ctrl + L or Alt + D or F6(Not For Opera) (Highlight Search Bar) – No need to move your mouse and click on the address bar to type a websites address in your browser again. Just use this quick shortcut.
Ctrl + E (Highlight Search Bar) – This will move the cursor to the search bar. Save the time you move your mouse over to the search bar!
Ctrl + (+/-) (Zoom In/Out) – Zoom in or Zoom out the current pages.
Ctrl + F (Find) – Instantly find a particular text on the current page.
Ctrl + C and Ctrl + V (Copy/Paste) – I bet you already know this!
Home / End (Top / Bottom) – These will help you to go to the Top or Bottom of a Page in a Jiffy.
CTRL + Click (Not for Opera) (Open Link in Background) – Open a link in a Background Tab without interfering your work.
CTRL + U (Source) – View the source code of the current website.
CTRL + left Click (Save Images (Opera Only)) – In fact this is a really a very handy shortcut that will save time. Why need to right click on an image and select the Save Image… option? Just Hold down the Ctrl key and click the left mouse button.
CTRL + Shift + T or (CTRL + Z also works in Opera) (Restore Tab) – This will help you to quickly reopen or recover previously closed Tab easily.

Some Additional Time Saver Keyboard Shortcuts

In fact these are some really useful shortcuts to save your time and energy.
You can save a lot of time by excluding the www., .com , .org, .net etc. There are simple keyboard shortcuts that can do these jobs very easily. We actually need to enter the name of the website only in the address bar of the browser.
Enter name of the website in the address bar and press CTRL + ENTER to auto-complete http://www. and the .com/ parts automatically. For example, type google in the address bar and press CTRL+ENTER, the browser will automatically make it http://www.google.com/.
Like wise SHIFT+ENTER will auto-complete the .net domains and CTRL+SHIFT+ENTER auto-completes the .org
If you feel that the mouse more comfortable and than the keyboard shotcuts, then i recommend you to, first try these shortcuts for a day or two to familiarize them. Once you do it you wont go back. And if you know any more shortcuts to be included please comment it down. I will surely include them in the post.

Useful Tweaks & Ways To Speed Up Firefox

make firefox 4 fast Useful Tweaks & Ways To Speed Up Firefox 4 Firefox  is on the way and the beta version has been released for the testing purpose. The new version  of the most popular browser is stunning in looks and performance. Here are some tweaks and ways which can be used to Speed Up Firefox

#1) Performance tweaks for firefox  to increase the browsing speed

Type “about:config” (without quotes) in the address bar and proceed by pressing the I’ll be careful, I promise button. Now in the filter field type in the following values one by one and set its value accordingly. For eg, type network.http.pipelining, you will see the corresponding value appearing below, double clicking it will set the value to true or false and if its some thing which has a value to be set, a popup window appears where you could enter the value for the field.
network.http.pipelining => true
network.http.proxy.pipelining => true
network.http.pipelining.maxrequests => 12
content.notify.backoffcount => 5
plugin.expose_full_path => true
ui.submenuDelay => 0
network.dns.disableIPv6 => true
javascript.options.jit.chrome => true
javascript.options.jit.content => true
If any of the above value doesn’t appear, then follow the steps below.
For a setting with true or false value. For eg, if you don’t see the value being displayed below while typing content.notify.backoffcount on the filter field just right click on an empty space and select Boolean from New. Type content.notify.ontimer in the box and set its value to true.
creating custom tweaks value in firefox Useful Tweaks & Ways To Speed Up Firefox 4
The same is applicable if you are setting a integer value, except that you need to select Integer from the right click menu.

#2) Speeding Up Firefox  by cleaning up the SQL Data base


Firefox uses a my sql database where various values and entries are being stored during its usage. With time this get accumulated like unwanted registry entries left behind after an uninstallation in windows. So its necessary to clean the firefox  database once in a while.
  • For this, Press Ctrl + Shift + J in your firefox browser. You would see the error console window being displayed.
  • Click inside the code field and paste the following code and press on Evaluate.
    Components.classes["@mozilla.org/browser/nav-history-service;1"].getService(Components.interfaces.nsPIPlacesDatabase).DBConnection.executeSimpleSQL(“VACUUM”);
    firefox 4 error console cleaning mysql query Useful Tweaks & Ways To Speed Up Firefox 4
  • Firefox will now freeze for some time and will be back to normal.

#3) Addons to browse faster on Firefox

Adblock Plus extension will block the advertisements you see on various websites and there by making things easier to read and enhancing your browser experience.
adblock plus for firefox 4 Useful Tweaks & Ways To Speed Up Firefox 4
Install from the Firefox add-ons page

How to Disable Autorun in Pen Drive

The USB Flash drive Autorun function is a great bless for many users. But still there are people who find this feature annoying or useless as it might not be comfortable for them. So if you want to disable the Autorun in pen drive, then here are the instructions to do it easily in Windows.
Disable Autorun in Pen Drive in Windows XP, Vista or 7
1. Type in ” gpedit.msc ” in Run to open Group Policy Editor.
2. Navigate to Computer Configuration > Administrative Templates > System.
Disable Pen Drive Autoplay How to Disable Autorun in Pen Drive
3. In the right side, double click on ” Turn off Autoplay “.
4. Check the enabled option and change the ” Turn off Autoplay on ” option to ” All drives “.
5. Apply the changes to disable autorun of pen drive.
That’s it! The Autorun feature will be now disabled.

Enlarge Images Without Losing Quality – 4 Tools

When we Enlarge images chances are very less that we might get a perfectly enlarged image without any loss of quality. Either the image will be blurred, pixelated or noisy. This is a common problem faced by most of the people while enlarging images. Recently,  I came  across a few softwares and online services that will help to Enlarge pictures without losing any quality/getting pixelated/blurred.
3066639170 23a01a56d3 m Enlarge Images Without Losing Quality   4 Tools

1) SmillaEnlarger

This small Image Enlarger will help you to enlarge images photos without losing quality or getting pixelated. SmillaEnlarger can also convert a low resolution images to a high resolution images by minimizing the images distortion and by maintaining as much as details as possible. SmillaEnlarger comes with many image adjustment options and a instant preview window to see the real-time preview of the enlarged images. This utility certainly gives dramatically good results.
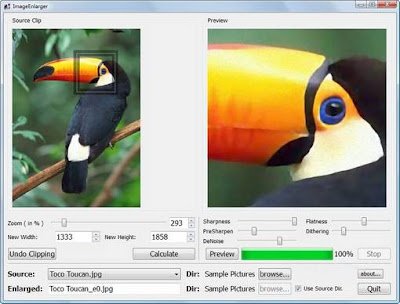
Smilla+Enlarger Enlarge Images Without Losing Quality   4 Tools
But there is some  thing that i found annoying with this tool. The Lack of a Save Option!. We need to first select the directory containing the images. The program will save the images automatically with a new name. In short this Image Enlarger is a nice application that will help us to easily enlarge the images without making it lose its quality or getting blurred / pixelated.

Download SmillaEnlarger

2) VectorMagic

You may know that vector images are made of lines and curves which also have their respective position and colors used, stored in the images. So what make vector images special is that they can be resized into any size. You can decrease the image size or enlarge it to any size without losing any of its qualities. So, if we can convert the BMP and JPEG (bitmap) images into vector images. Enlarging images without losing quality will not be a problem at all. Thanks to Ray from Raymond since i came to know about vector magic from there.
Vector Magic is actually a website that will help you to enlarge images online. Vector Magic website provides a free online service to convert bitmap images to vector images easily. It makes this possible using its auto-tracer service.
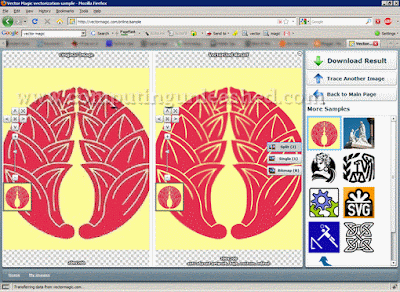
Vector+Magic Enlarge Images Without Losing Quality   4 Tools
How to Use Vector Magic to Enlarge images
(You need to have adobe flash player installed in your system for this to work)
  1. Browse the Bitmap image to be converted into vector format and click on Upload.
  2. Now Select the quality level of the image and select if the image less than 12 colors or more than that.
  3. Choose the palette needed to convert your image into vector format.
  4. This is it. The final vector image can be downloaded in PNG, SVG or EPS formats.
You can now enlarge the image to any amount of size as needed without losing any quality or getting pixelated/blurred. Vector Magic produces excellent results and moreover it is free and its the best way to enlarge images free.

Visit Vector Magic to Enlarge Images

3) SizeFixer – Enlarge images up to 400%

SizeFixer is a wonderful tool from FixerLabs. Before starting with let me say SizeFixer is not a Free Tool so i didn’t wanted to include this in here, but later i thought of its usefulness to professionals so i included SizeFixer. What makes this tool special is its capability to enlarge images upto 400% of its original size. Thats way ahead of other softwares can do. SizeFixer makes this possible by automatically erasing the dark and faded parts in the image thus giving rise to a high clarity image without losing quality. SizeFixer was first released in 2005 for MAC. Later the windows version came up promising to enlarge images by 33×46 inches without losing any of its quality.
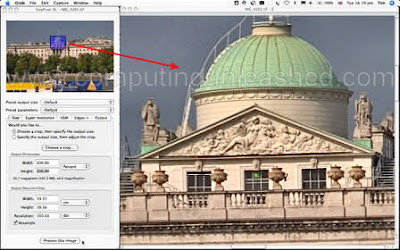
SizeFixer Enlarge Images Without Losing Quality   4 Tools
The “super-resolution technology” of SizeFixer contributes to the making of such gigantic images. SizeFixer comes in 3 different versions – XL, SLR & Home. SizeFixer Home version can Enlarge images upto a size of 16 Mega Pixels. SizeFixer is a pricier tool but it is worth for professionals. SizeFixer XL, SLR & Home costs $199.95, $269.90 & $59.95 respectively. SizeFixer is not just an ordinary tool because it is used by the government authorities, military and also in NASA. If you want to experience what SizeFixer is actually capable of then i suggest you to go for a free trial first.

Download Size Fixer

4) Reshade – Photo Enlargement Without Quality Loss

Reshade eliminates most of the problems faced during photo enlargement process such as pixelation, loss of focus, loss of sharpness, exagerated noise . Reshade also comes with an online service to resize the images. You can make the image smaller or enlarge it. The Desktop Version of Reshade is not free and it costs 149$ to buy and there is a premium online service too which offers similar features of the desktop application.
I am dealing with the free online service of reshade since it is free and does a decent job. It is adequate for home use. Professionals may require the paid version. You can use the Reshade service with or without an account but the features will vary. It is free to create  free account with reshade and it provides some more features. Signing up for a free Reshade account offers you the ability to enlarge images to a maximum resolution of 1920x1200px with a zoom of 2X.
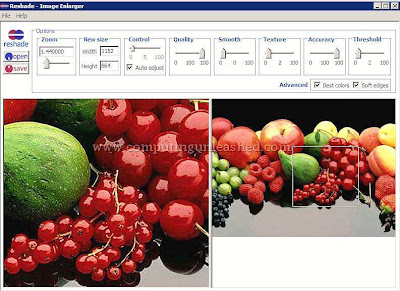
Reshade Enlarge Images Without Losing Quality   4 Tools
You will be able to enlarge images to standard monitor resolutions, enhance poor quality images, crop. It supports JPG, BMP, GIF, PNG image formats,  single frames and non-transparent, maximum file size is 10MB, maximum size is 4000×4000 pixels, minimum size is 50×50 pixels. You can either upload the image from your system or from direct link and then you can select the specifications and the enlarged image without much loss of quality will be ready for download with in a few seconds!
Visit Reshade Free Image Enlarger